Roles Management
This feature allows you to handle the roles of the application. Roles define how users can access different system resources. A given user can have multiple roles, and roles are cumulative. With the User Manager AppJar, you can create roles at runtime and assign them to users. This section of the documentation explains how an administrator can manage the roles of the application.
Roles listing
When you open the view, the application displays a listing of all available roles in the system. You can apply filters to manage large role lists.
The view has two areas: The upper area holds the filter components and the New role button, and the lower area has the roles grid.

Filters
This view displays a field for filtering roles by Role name. Once you enter content in the filter component, Filter and Clear buttons become available.
Filter actions
- Clear: Click this button to remove all criteria from the filter field and restore the roles grid to its default state.
-
Filter: Click this button to apply the current filter criteria. The application filters the grid contents using the supplied information, as follows:
- Role name: Enter text to view role names that contain the entered string.
Tips
- If you enter
admin the Role name filter, you see roles with names administrator and admin given that they contain the string "adm" in the name.
Roles creation
The New role button appears in the upper area, on the right side of the filter components. Click this button to open the role creation dialog, which supports creating new roles in the system.
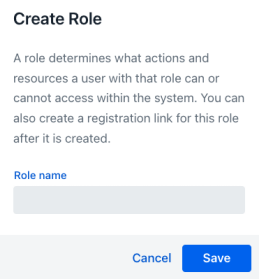
Role name
This required field represents the role's name in the system. You enter the role name when creating a new role.
The role name must be unique. The User Manager AppJar validates that the role name isn't already taken before saving.
Warning
If the role name is already in use, the save operation fails the validation, and the system displays an error message.
Action buttons
The dialog provides the following action buttons:
-
Save: The Save button persists the new role in the database. The system executes required validations before saving and displays any errors so you can fix problems before trying the save operation again.
-
Cancel: The Cancel button discards the changes and returns you to the roles listing view.
Roles grid
In the lower area, the roles grid displays the roles in the system. By default, the grid shows all available roles. After applying search criteria, the grid displays only the filtered roles. This grid shows the following columns:
- Id: Displays the unique numerical identifier for the role. The system assigns this value automatically.
- Role name: Displays the role's name assigned during creation.
- Users with this role: Displays the number of users assigned to this role.
- Groups containing this role: Displays the number of groups that contain this role.
- Actions: Displays a dropdown menu that shows actions you can execute on the role in the current row. To learn more, see the action menu.
Action menu
Role actions display in the actions column dropdown menu, which appears when you click the three dots in the actions column.
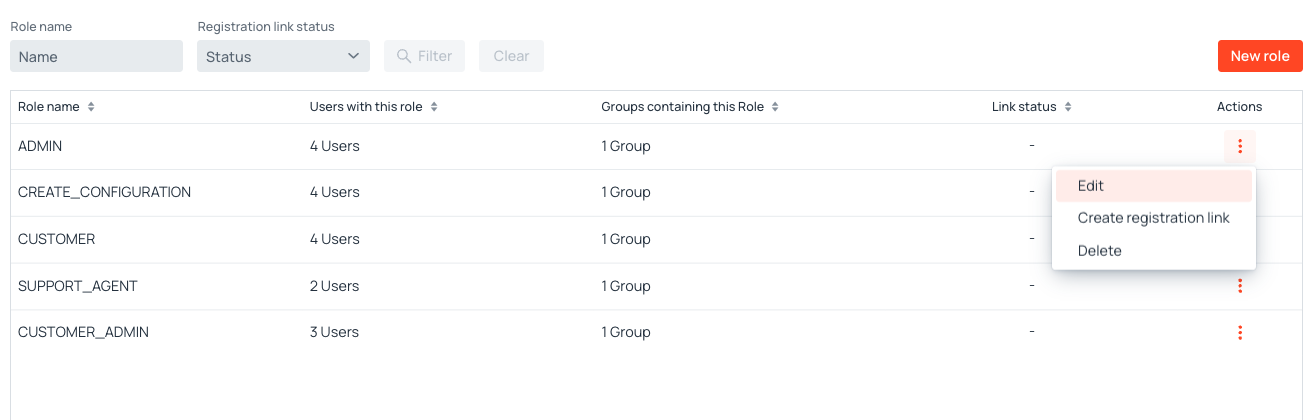
Edit role
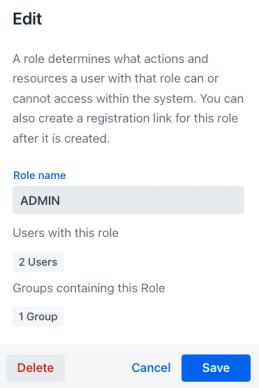
This action displays the role's edit dialog. You can modify the role's name. The dialog includes the same structure as the role creation dialog.
The main difference is that the Delete button appears in the action buttons section. To learn more, see the delete role.
Action buttons
The dialog provides the following action buttons:
-
Save: The Save button persists the changes you make. The system executes required validations before saving and displays any errors so you can fix problems before trying the save operation again.
-
Cancel: The Cancel button discards the changes and returns you to the roles listing view.
-
Delete: The Delete button appears only when editing an existing role. To learn more, see delete role.
Create registration link
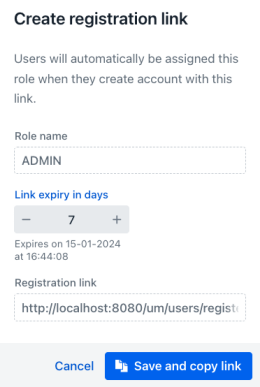
This action opens the registration link creation dialog. The dialog allows you to create a registration link that can be shared with new users. Users who follow the link can register themselves and will be automatically added to this role.
The dialog displays the selected role name and provides you with a component to set the number of days after which the link will expire (defaults to 7 days). Below this part, a text displays the estimated date and time when the link expires. The generated registration link appears in a read-only text field. Finally, the dialog presents two action buttons:
- Cancel, which stops the creation process.
- Save and copy link, which persists the link and copies it to the clipboard so you can share it with new users.
Delete role
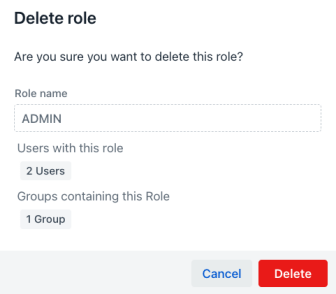
This action displays a confirmation dialog before executing a permanent deletion of the role from the database. The dialog shows the role's details, including the role name, number of users assigned to this role, and the number of groups that contain this role. You confirm the deletion process by clicking the Delete button in the dialog.
Impact on access rules
When the role is used by one or more access rules, the confirmation dialog reports what deleting it does to those rules, above the usual role details. Two lists may appear:
- Rules whose role criteria will change: Rules that keep at least one other role. These remain valid, but their meaning changes. A rule that grants access to users holding all of its roles stops requiring the deleted one, and therefore grants access more widely. A rule that grants access to users holding any of its roles loses one of its alternatives, and therefore grants access more narrowly.
- Rules that will be deleted because this is their only role: Rules left with no roles at all. A role-based rule cannot exist without roles, so these are removed along with the role.
Each affected rule is listed by its description, or by its number when it has none.
Warning
Confirming the deletion applies these changes to the access rules immediately, and they cannot be undone. Review both lists before proceeding, because a widened rule grants access that was previously refused.