Processes Management
This feature allows an administrator to manage the background processes registered in the application. It provides a central view to monitor, schedule, run, pause, and delete processes, as well as to inspect their execution history.
Processes Listing
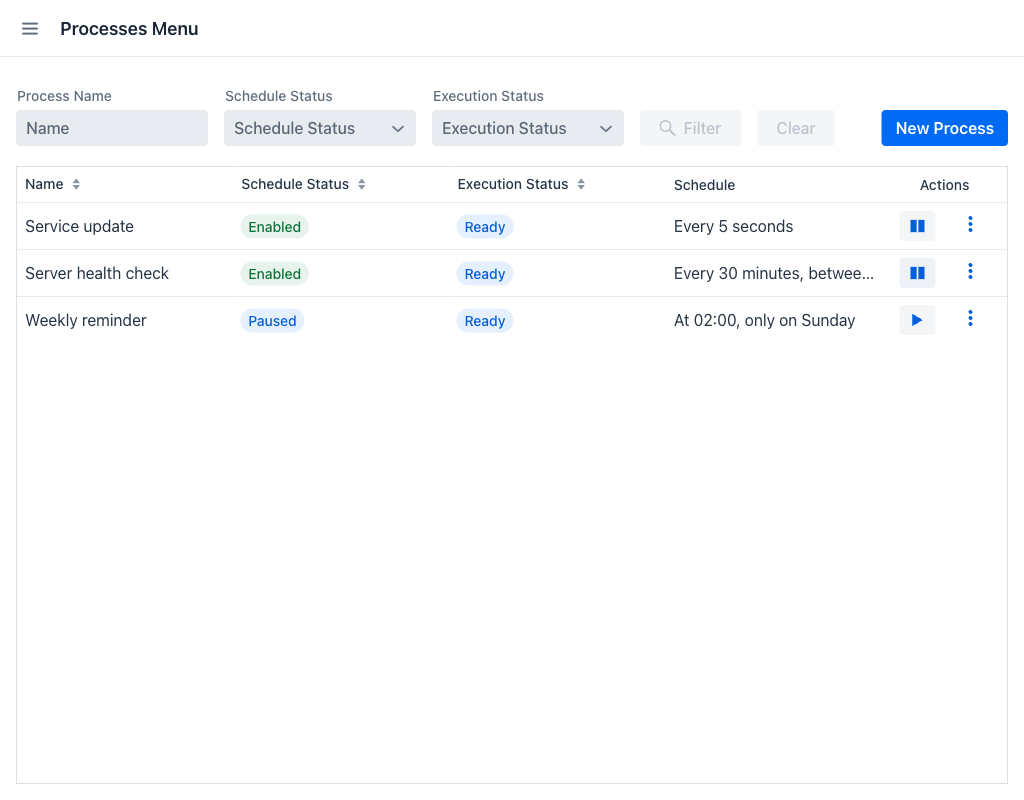
When entering the view, a grid is displayed showing all the processes registered in the system, along with filter controls to narrow down the results.
Filters
The following fields are available to filter the processes displayed in the grid:
- Process Name: Filters processes whose name contains the entered text.
- Schedule Status: A dropdown that filters processes by the state of their schedule. See Schedule Status for the list of possible values.
- Execution Status: A dropdown that filters processes by whether they are currently executing. See Execution Status for the list of possible values.
The Filter button becomes active as soon as any filter field has a value. Clicking Clear resets all filters and refreshes the grid.
In the filter area, at the right, there is a New Process button. Clicking it opens the process creation dialog.
On narrow screens the three filter fields are replaced by a single Filter button that opens them in a dialog, and the Schedule column is hidden so that the grid remains readable.
Processes Grid
Below the filter area, a grid displays the matching processes with the following columns:
- Name: The display name of the process.
- Schedule Status: A coloured badge indicating the state of the process schedule. See Schedule Status.
- Execution Status: A badge indicating whether the process is executing right now. See Execution Status.
- Schedule: A human-readable description of the cron expression assigned to the process. Empty if no schedule is set.
- Actions: Inline action buttons and a contextual menu with additional operations. See Process Actions.
Both status badges update on their own, without reloading the view. When a process starts or finishes an execution, or when another administrator pauses or resumes it, the badges and the row actions change for every administrator currently looking at the view.
When there are no processes matching the current filters, a hint message is displayed in place of the grid.
Process Statuses
A process carries two independent statuses. The schedule status describes what the schedule is doing; the execution status describes whether the task is running at this instant. One does not affect the other: a process keeps its schedule status while it executes.
Schedule Status
- Enabled (green): The process has a schedule and will run according to it.
- Paused (default): The process has a schedule but its trigger is cancelled. It can be resumed at any time.
- Unscheduled (yellow): The process has no schedule assigned. It does not run automatically, but it can still be executed on demand.
- Task not found (red): The underlying task implementation could not be found at runtime. The process cannot be executed.
Execution Status
- Running (grey): The process task is executing right now.
- Ready (default): The process is not executing.
Process Actions
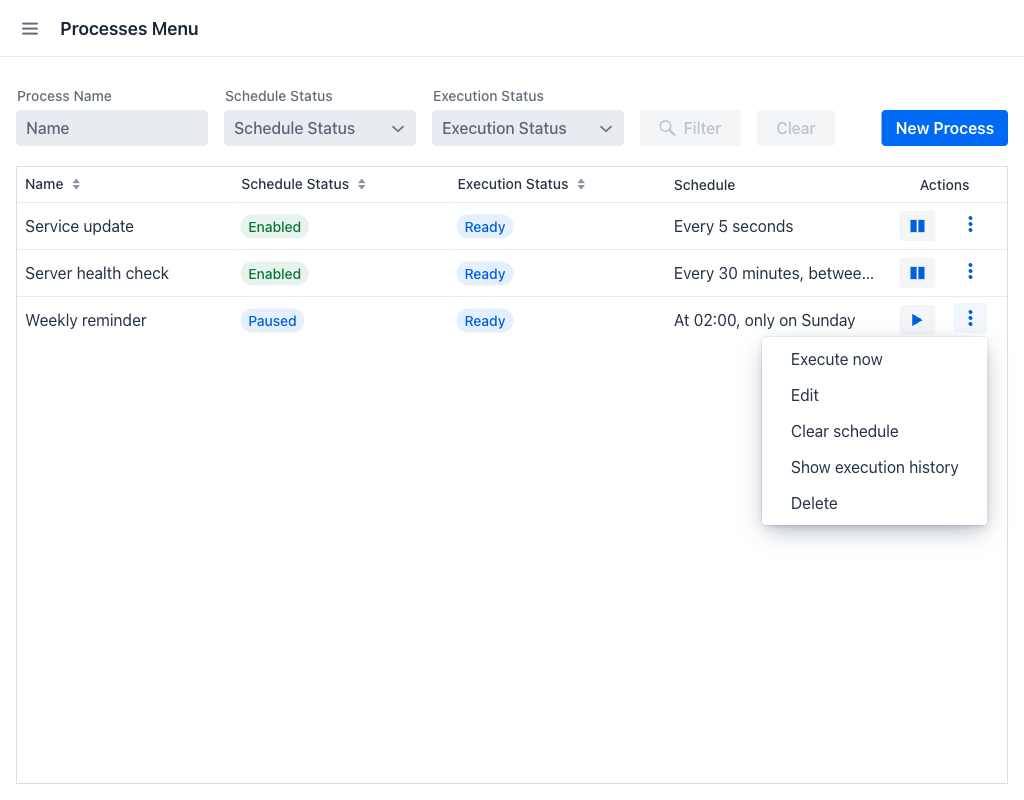
Each row in the grid provides a set of actions that vary depending on the current status of the process.
Inline buttons
- Play (▶): Resumes a process whose schedule is Paused. It is also shown, disabled, for Unscheduled and Task not found processes.
- Pause (⏸): Pauses a process whose schedule is Enabled.
If a process can no longer be paused when the button is pressed, because its status changed in the meantime, an error notification explains that the transition is not valid.
Contextual menu (⋮)
Clicking the vertical dots icon opens a menu with the following options, depending on the status of the process:
- Execute now: Immediately triggers a single execution of the process, regardless of its schedule. Available for any process whose task can be resolved and that is not already Running; the option disappears from the menu while an execution is in progress. If the process starts executing before the option is confirmed, an error notification explains that it is already running.
- Edit: Opens the process edition dialog. Available for any process whose task can be resolved.
- Clear schedule: Removes the schedule of the process and leaves it Unscheduled. Available when the schedule is Enabled or Paused.
- Show execution history: Opens the execution history dialog for the selected process. Available for all statuses.
- Delete: Deletes the process after confirmation. Available for all statuses.
Process Creation / Edition
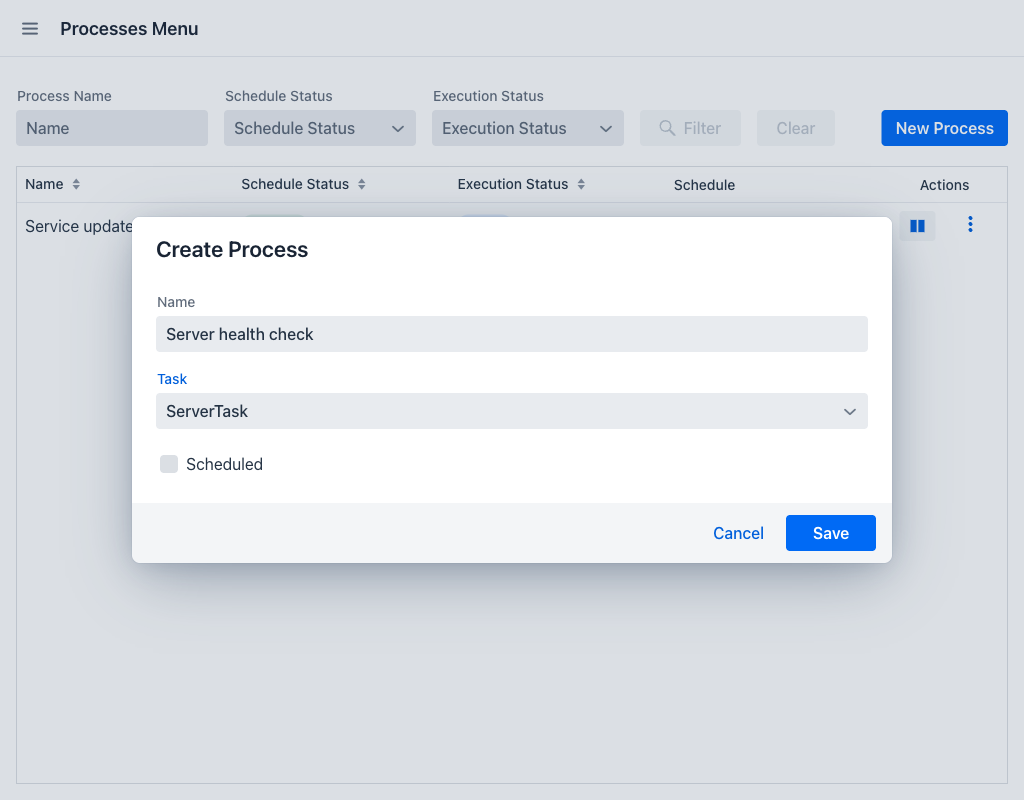
Creating or editing a process opens a dialog containing the process form.
Form Fields
- Name: Required. The display name of the process. Must not be empty.
- Task: Required. A dropdown listing all
Runnableimplementations registered in the application. This determines which logic will be executed when the process runs. The task cannot be changed once the process exists: when editing, the dropdown is read only. To run a different task, delete the process and create a new one. - Scheduled: A checkbox that reveals the schedule editor described in Defining the Schedule. Clearing it removes the schedule, leaving the process Unscheduled.
Action Buttons
- Save: Validates and persists the form. If validation errors are present, the invalid fields are marked and the dialog stays open. On success, the dialog closes, a confirmation notification is shown, and the grid refreshes.
- Cancel: Discards changes and closes the dialog.
- Delete: Only visible when editing an existing process. Opens a confirmation dialog before permanently removing the process.
The deletion confirmation dialog shows the name and the schedule status of the process before it is removed.
Warning
Process deletion is a permanent action and cannot be undone. Deleting a process also removes its entire execution history.
Defining the Schedule
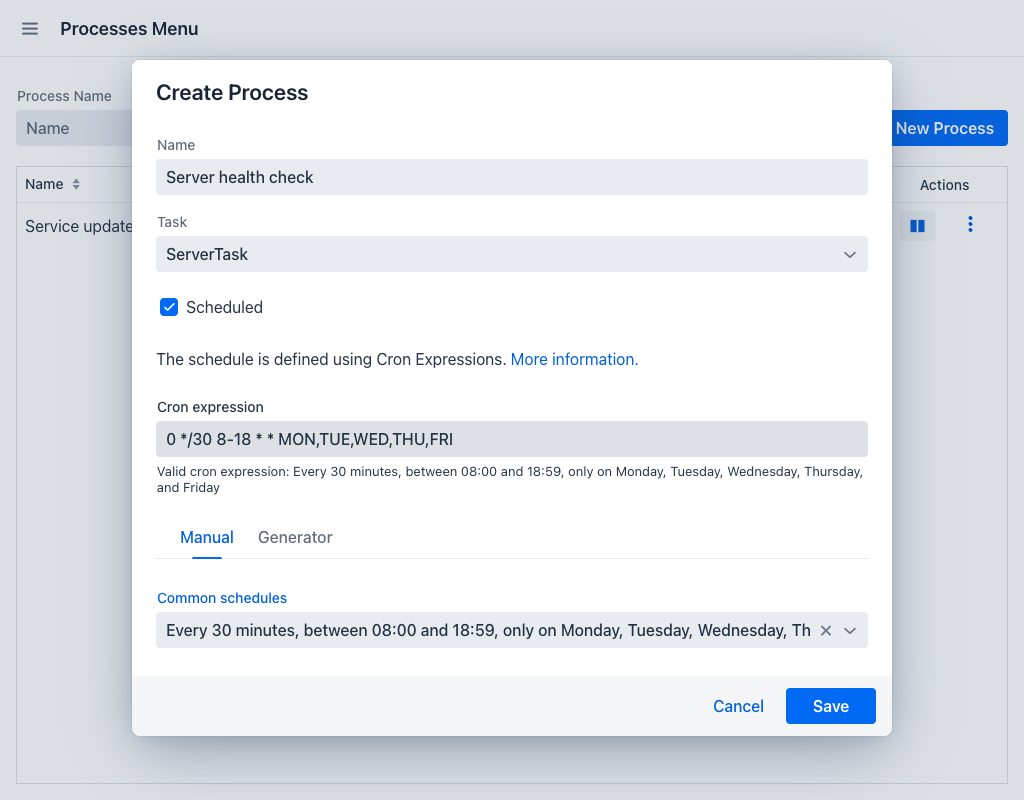
The schedule determines when a process runs automatically. It is edited inside the process form: selecting Scheduled reveals the schedule editor.
Cron Expression
The Cron expression field always holds the schedule, whichever of the two tabs below it is in use. Any valid cron expression can be typed into it directly. As the expression changes, a description of it in plain language is shown under the field, prefixed with Valid cron expression:. An invalid expression marks the field and prevents saving. A More information. link points to the cron expression reference.
Manual
Provides a Common schedules dropdown with five predefined presets:
- Every 15 minutes
- Every 30 minutes, between 08:00 and 18:59, only on Monday, Tuesday, Wednesday, Thursday, and Friday
- Between 08:00 and 18:59, only on Monday, Tuesday, Wednesday, Thursday, and Friday
- Between 02:00 and 04:59, only on Monday, Tuesday, Wednesday, Thursday, and Friday
- At 02:00, only on Sunday
Selecting a preset writes its cron expression into the Cron expression field. An expression that matches a preset is selected in this dropdown automatically.
Generator
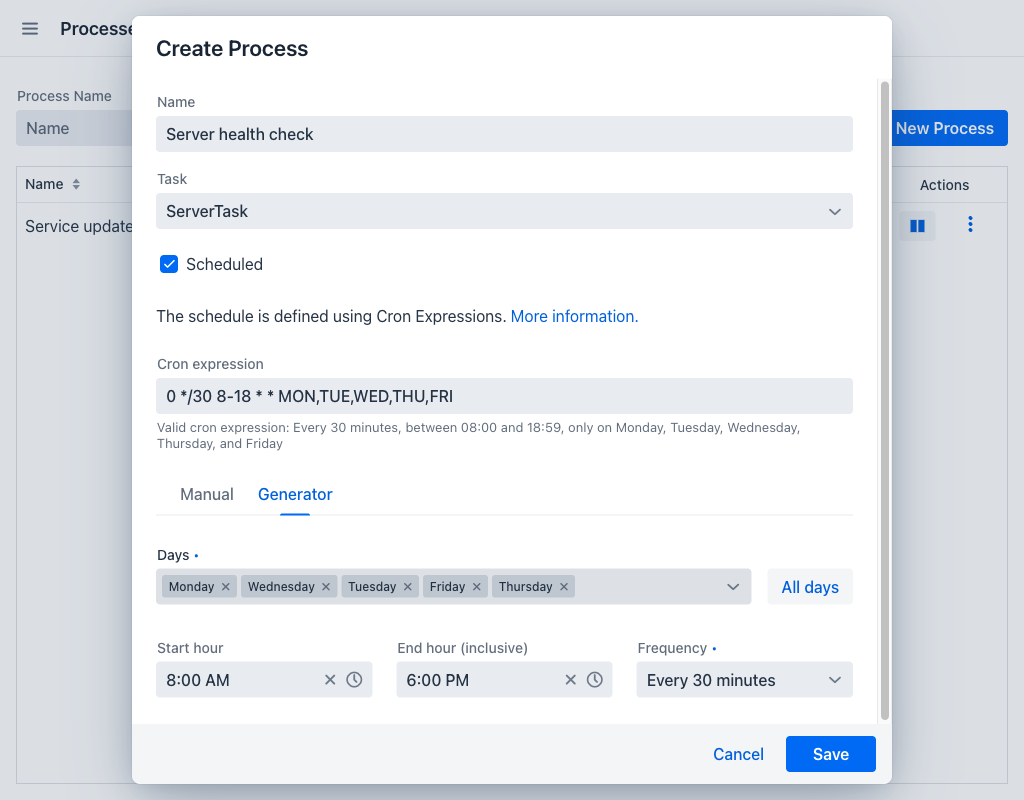
Builds a cron expression from four controls, without requiring any knowledge of cron syntax. Every change to a control rewrites the Cron expression field immediately:
- Days: A multi-select listing the seven days of the week. At least one day is required. The All days button next to it selects all seven at once.
- Start hour and End hour (inclusive): Restrict the schedule to a range of hours. Only whole hours can be selected. Both must be set, or neither; the end hour must be at or after the start hour. Leaving both empty schedules the process across the whole day.
- Frequency: How often the process runs within that range. The available values are every minute, every 5, 10, 15, 20 or 30 minutes, and every hour.
The relationship works in both directions: an expression already in the Cron expression field is read back into the four controls whenever it can be represented by them. Cron syntax that falls outside what these controls can express — a specific day of the month, a seconds interval, an irregular list of hours — cannot be reproduced, so the Generator tab is disabled for as long as such an expression is in the field. The expression itself is kept and remains valid; only the generator is unavailable.
The schedule is stored when the process form is saved. A process saved with a schedule starts out Paused; use the Play button in the grid to activate it. Editing a process whose schedule was Enabled keeps it enabled with the new expression.
Execution History
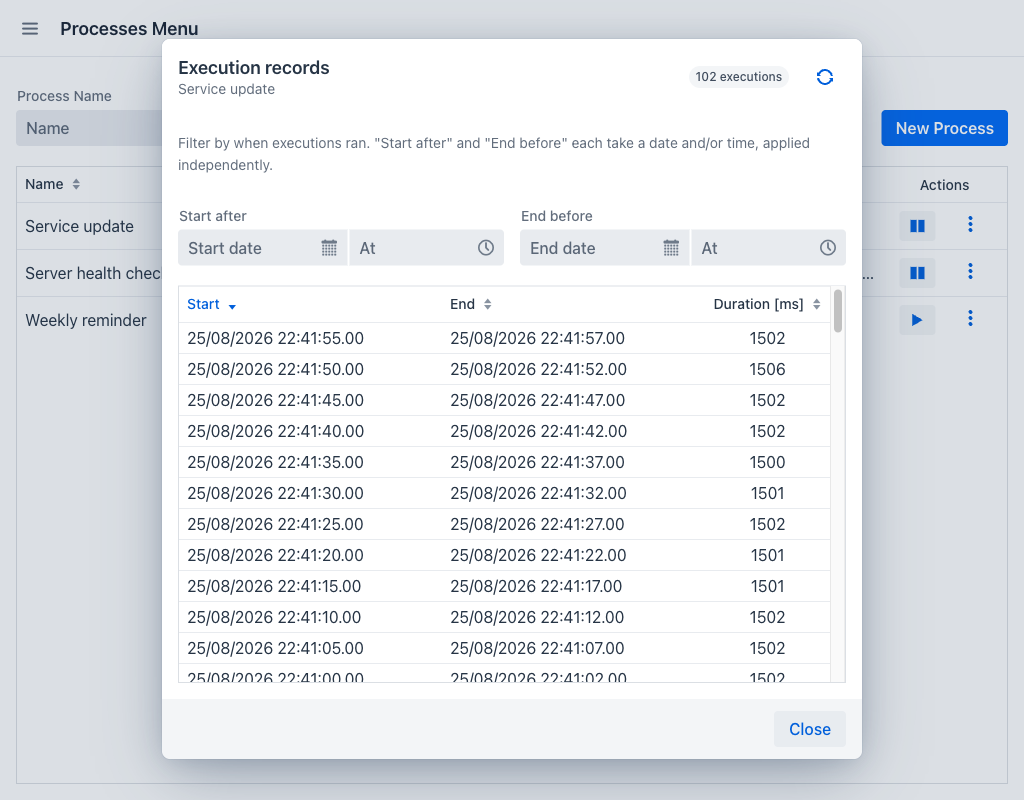
The Execution records dialog shows a log of past executions for a specific process. Its header displays the name of the process and a badge with the total number of executions recorded for it.
Filters
- Start after: Restricts the results to executions that started at or after the given point. The date and the time are independent: setting only the date matches any time on that day onwards, and setting only the time matches that time of day on any day.
- End before: Restricts the results to executions that ended at or before the given point, with the same independent handling of date and time.
Both filters update the grid automatically as values change, and each part can be cleared on its own.
Execution Grid
The grid displays the following columns for each execution record:
- Start: The date and time when the execution started.
- End: The date and time when the execution ended.
- Duration [ms]: The total duration of the execution in milliseconds.
Executions are listed with the most recent first, and every column can be sorted and resized. Times are recorded in UTC and displayed in the time zone of the browser.
A Refresh button in the dialog header reloads the data, and a Close button in the footer dismisses the dialog. When there are no records matching the current filters, a hint message is shown.
Free Mode
When the application runs without a valid Process Manager license, the view operates in free mode. A Limited version bar is displayed above the grid with a Processes counter showing how much of the free allowance is in use.
The allowance is two processes. Once two exist, the New Process button is disabled and no further process can be created. The two processes themselves remain fully usable: they can be scheduled, paused, resumed, executed on demand, edited and deleted, and their execution history stays available. Deleting one frees a slot.
An application that previously ran with a license may hold more processes than the allowance. In that case the row actions are disabled as well, and the only action left on each row is Delete. Removing processes until two remain restores the rest of the actions.